11.30.2009

Sketchy, Skethcy

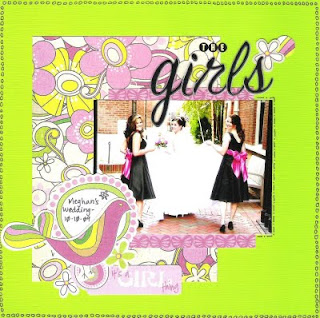
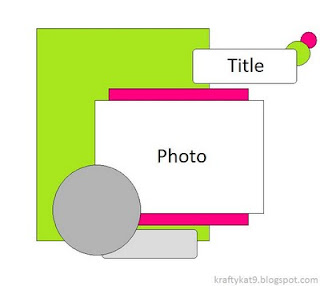
Hey, all! So, I have yet another sketch for you...I need to start mixing it up a bit, huh? I'd love to see what you end up doing with it: And here is a layout that I made using this sketch (or, if I'm going to be quite honest, I made the sketch using this layout...)

On another note, I'm really excited about my Winter/Christmas challenge. I have already had three really cool entries. There really are some very talented people out there! Hopefully, I will see a few more...remember you have until 11 December to enter.


Until next time...happy kraftin'!

11.29.2009

Christmas wreath!

I made my Christmas wreath a few days ago and it was super, super easy. To complete this project you only need a few items:

-an undecorated wreath
-wire ribbon (I prefer the 2 inch)
-assortment of Christmas ornaments (I used mini ball ornaments and some word ornaments, but this is where the uniqueness comes in, so have fun using whatever kind you like!)
-hot glue gun

All you need to do is wrap the ribbon around the wreath and randomly glue on the ornaments...I told you it was super, super easy. Here is what my finished product looked like:

I hope everyone had a wonderful Thanksgiving.

11.25.2009

Sketch

Hey, all! Sorry I've been MIA for awhile...went on a little vacation (more pictures to scrap!!). This is a really quick post. I just wanted to share a quick sketch with you:


And here is a layout using that sketch:


Hope everyone has a fabulous Thanksgiving...don't forget about my challenge!

11.19.2009

Challenge Time!!

Hey, all! It's time for my first challenge and I'm pretty excited about it. First, here's what's up for grabs:

-K & Company Christmas/Winter paper pack (12x12)
-Jolee's snowflake stickers
-Me & My Big Ideas Christmas chipboard
-Plus a small goodie bag from me filled with a random assortment of embellies

If you enter this challenge, and you don't celebrate Christmas, just let me know. That way, if you win, I will come up with a different prize for you that you can actually use.

Here's what you have to do to win:

-Design a layout about Winter or Christmas

-Post the link to your layout in the comments section of this post by 6 pm PST on 11 December (that's a Friday...and 3 weeks away, so you have plenty of time)

-That's it!! Super easy challenge, but hopefully pretty fun...I always get into the Christmas spirit just a few weeks before Thanksgiving. By the time this challenge is due, I figure most of you will be pretty psyched for Christmas too!

Here are some layouts that I have done that fit the challenge criteria:


So, get to scrappin' and I can't wait to see what everyone comes up with!!
11.17.2009

Another sketch!

Hey, all...I have a new sketch for you! It's another simple one...but maybe it will inspire you anyways!

And here is a layout I made using that sketch:

Link your layouts to this post...I would love to see what you decide to do with this sketch!

11.16.2009

Make your own patterned paper!

Hey, all! I want to share a few fun ideas with you on how to get some awesome patterned paper. I love bright colors and unique patterns, and sometimes the only way to achieve the look I want, is to make it myself. For all these projects, I recommend using acrylic paint. It dries really fast on paper, so you can make your paper, fold a load of laundry, and when you come back, it's ready for scrappin'!

The first technique I like to use requires an aluminum can or two. Take an aluminum can and paint the bottom ring of the can in your desired color. Then stamp the can onto the paper. I recommend using a separate can for each color unless you actually want two-toned rings (which would look pretty awesome). Here is the result:


To achieve the second look, paint a layer of paint onto the bubble side of bubble wrap. Try to only keep the paint on the bubbles. I recommend using a foam paint brush. If you paint across the bubbles real fast, as if you were painting a piece of wood, you shouldn't get much paint between the bubbles. Flip the bubble wrap over, so the paint side is laying on the paper and pat the bubble wrap so it sticks to the paper. Then peel off. I like to use two different colors from the same color family, but I bet any combination would look great. Here is the result:

For this last technique, I once again recommend using a foam paint brush. You will also need some tissue paper. Ball up the tissue paper, as if you were about to stuff it into a gift bag. Then add a layer of paint to the wad end. Don't worry about covering all the tissue paper. I like to pick certain wrinkles to paint. Once you have applied your paint to the tissue paper, stamp it on to your scrapbooking paper. Here is the result:

Here is a layout I made using the rings paper (layout based on a sketch from Creative Scrappers). I like that I was able to customize the colors to match the other patterned paper:

And here is a layout I made using the bubble wrap paper (layout based on a sketch from ScrapSketch):

You can view another bubble wrap layout in yesterday's post entitled "thankful 4 friends."
As always, I would love to see any layouts that you decide to use these techniques on...just link them to this post! And keep checking back...I will be posting my first challenge later in the week (sweet prize for the winner!).

11.15.2009

Giveaway winner and a sketch!

Hey, all! So, first I want to give a big THANK YOU to everyone who participated in the giveaway. I got a lot of awesome input. The consensus is that you want to see sketches, challenges, and techniques.

And, now for the winner...I went to http://www.random.org/ to pick a winner...and that winner happens to be Ms. Schwiet! So, Ms. Schwiet, please email your mailing address to kraftykat9@gmail.com and I will get your prize in the mail.

As previously mentioned, a lot of people said that they wanted to see sketches. I've actually never done a sketch before, so I figured that I should start off fairly basic:

And here is one of the layouts I made with it:

And then I flipped the sketch on it's side to create this one (using super fun Crate Paper):

If you decide to use this sketch, I would love to see your work...just link it to this post.

11.14.2009

Got Scraps? Make Squares!

Hey, all! Recently I've been on a square kick. I love making layouts with squares. It's super easy and quick to do, and I think it gives layouts a nice, clean look. Plus, it's a great way to use up some of those scraps that I know you have laying around. Here are a few ideas:
For this layout, I made squares out of patterned paper that were the same size as the photos and then randomly placed the photos and patterned paper. (P.S.- Don't you just love those Prima fabric words???)
For this one, I actually used the squares of patterned paper to create a background: For this layout, I once again cut the patterned paper to be the same size as the photos. However, I canted all the photos and patterned paper to give it a more unique look:
For this one, I used the squares to create the background and I used a corner rounder to give the squares a slightly different look:
And finally, for this layout I used the squares to create a background and interspersed some stickers throughout:
So, hopefully I've inspired you to get out there and use some of those scraps. And don't forget about the giveaway that I posted yesterday. You still have one more day to enter!

11.13.2009

GIVEAWAY!!

Hey, all!! In honor of my new blog, I'm doing my very first giveaway! Here's what's up for grabs:


*1 set of K & Company "simply sweet" layered accents
*1 package of Making Memories tiny alphas
*1 package of Petaloo flowers
*1 package of Colorbok adhesive gems

I absolutely love all these products. I was involved in a swap on Scrapbook.com and my pal, Jackie, gave me a package of those awesome Petaloo flowers. I haven't had a chance to use them yet, but I have them ready and sitting on my desk to use in my next layout.

Here is a layout that I did with the K & Company layered accents. It's a scraplift of the layout "Lil Biker Dude" by Kelly Gorree.

And here is a recent layout I did using the Making Memories alphas. I used a sketch by Helen Croft to create this:

Okay, so what do you have to do to win this? It's REALLY SIMPLE. All you have to do is leave a comment on this post telling me what kinds of things you would like to see here. In other words, what kinds of things would keep you coming back for more? Do you want challenges? Sketches? Tell me! I wanna know!
Yep, it's that easy, and I will randomly pick a winner on Sunday evening. So, you'll have to come back at least once more to see if you're a winner!! :o)

11.12.2009

Lovebirds Christmas Ornaments

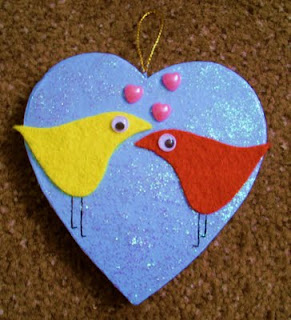
So, I was messing around a few weeks ago and came up with the idea to make these cute ornaments:
I got the idea from a mini book kit that I had purchased at my local scrapbook store, The Pink Pineapple. The kit came with some felt pieces and the template to make a little bird. I thought the birdie was just so cute and easy to make, so I expanded on the idea to create the lovebirds ornament.


Here are the supplies you will need:

*Pre-made, unfinished ornament (
Michael's has great ones for only $0.99 in their woodcrafting aisle...and they're actually made out of cardboard)
*Felt
*Googley eyes/sequins
*Heart-shaped brads/sequins/rhinestones
*Paint
*Glitter Glue
*Black pen/fine-tip marker
*Scissors
*Paint brush
*Adhesive

Directions:

1. Paint the unfinished ornament the color of your choice. Once the paint is dry, add a coat of glitter glue.

2. Cut the birds out of felt using the birdie template provided. I typically cut out the pattern first and use a needle or pin to hold the the paper pattern in place on the felt.

3. Adhere the felt birds to the dry ornament. Glue on eyes, heart, and draw on the legs.


You can always find special ways to personalize the ornament, by putting names on the birds, etc. I'm making a few of these to give as little gifts to people for Christmas. It's a cute idea, it shows you put time into the gift, and if you make a few, it's a pretty cheap project...I bet kids would like making them, too!

It's Me!

Hey, all...

So, let me begin by saying that never in a million years did I think that I would become a "blogger." Nothing against bloggers at all, but I could just never actually see myself doing it. However, I've become addicted to this little hobby called "scrapbooking," and recently I've been considering trying to join some design teams. I noticed that every application asks for your blog address...and whoopsies!...I didn't have one.

So...here I am, making my blogging debut! My goal is to share some different projects with you, including some of my scrapbook layouts, host a few challenges and have a few giveaways. Should be super fun...if I don't crash and burn and no one decides to follow me...

Later today I will be posting my first project. A hint: it's great for the upcoming Christmas season...